Prikaz objav z oznako ganache. Pokaži vse objave


It's my baby's birthday! I really would not be me, if I didn't take advantage of the fact that he has not yet reached that stage where he starts getting weird or elaborate ideas of what kind of cake he wants for his special day. I have no doubt that next year will be different. So his star sign is right in the between leo and virgo, but if you knew him, he is definitely a leo. So why not make a lion cake for my little lion?

I quickly typed "lion cake" into Pinterest, but I really didn't get any "wow" ideas with the exception of this cake, which is totally insane. But the thing is that as much as I love working with fondant, because it is a great medium for this kind of masterpieces, no one in my family really likes it (does anyone like it?!), so I try to challenge myself and create cakes without fondant. How about chocolate?

So, step one - three types of ganache! Dark chocolate ganache (use ratio of 2 : 1 for chocolate : cream), milk chocolate ganache (ratio of 2,5 - 3 : 1 for chocolate : cream) and white chocolate ganache (ratio of 3 : 1 for chocolate : cream). Ganache will need some time to cool and thicken, especially in the summer temperatures, so in the meantime, let's go to the next step - defrost leftover cake.

When I bake I always have some leftover cake. Usually it is the top of the cake, which I remove to get the cake completely flat. What do you do with it? Please don't say you throw it out. OK it is partially acceptable if you eat it, but if you bake a lot, these leftover tend to pile up. Regardless of the amount, I just wrap it in plastic wrap and store it in the freezer and then use it later to make cake pops. So ... defrost the cake, crumble it into small pieces and add some mascarpone cheese or melted chocolate. The amount of extra ingredients to add varies depending on the cake I use, some are a bit dryer and may need more, some are more moist and may need less; I just go by my feeling. Mix everything together, I just use my hands and squish the mix until it kind of resembles modelling clay.
Print out a photo or a sketch of what you are modelling, just make it as big as your model. This way it is a great reference for proportions and final look. And let the modelling begin ...


At this point, a warning ... learn from my mistakes. The lion face was kind of heavy in the end and it sagged the cake on one end, when I put it on top. The cake luckily didn't collapse or fall apart and in the end all was well. Even better, because of the sagging the muzzle sat more low on the cake and the proportions were more realistic this way. Nevertheless, think about one of the following preventative measures:

1. leave the cake to sit a couple of hours in the fridge, even better over night; I was in a hurry and I decorated my cake immediately after assembling it. 

2. use support; model the face on a cardboard and support it with straws; basically like assembling a tiered cake.

I frosted the cake in a thin first layer of ganache, only the snout and the eyes are fondant. The mane is dark ganache, piped with the grass tip (tip # 133). Because the head is so irregular in shape, it was harder to smooth out the ganache, but I managed and then put another layer of ganache with a brush. Because I used a brush, the ganache seemed more fur like.


And the reaction? He cried. No, not from excitement or joy. Apparently this little monster was too realistic for a 3-year old and he needed a minute to calm down. I think it helped that his older brother started picking of the chocolate mane :) In the end I was happy with how the cake looked and I made it up to the little guy with the next cake (link soon, check back soon!).


Recently I had a request to make the triple mousse cake again. Actually some time has passed from my first attempt and these blog posts are consecutive only because I had finally gotten around to editing this blog as well. My original Slovene blog was and still is my priority. Given that both my blogs are still small and kind of new, I was surprised and beyond happy to get a very specified request saying to please make the triple mousse cake with some flowers like on my Mother's day cake. Yeeeay I am always excited  to know that someone actually took time to look at my blog and that I actually have readers. 

It was meant as a birthday surprise for my husband's colleague's mother. I didn't want this nice older lady to struggle with the firmer brownie base, so instead I chose a softer option, baking a vanilla sponge I most often use for my cakes. I baked only one disc to serve as the base. If you remember I also regretted the raspberry mousse from the original recipe not being raspberry tasting enough. I substituted the raspberry layer with the one from my Entremet recipe, which proved to be the winning combination. The amounts are also adapted for the bigger sized cake as before. Just note that after making it I noticed that the dark mousse layer is a bit taller than the other two, so the amounts below are already reduced and should give you even layers.

For a 26 - 28 cm size cake:

Sponge
100 flour
100 g brown sugar
2 eggs
40 ml water
40 ml oil
1 vanilla bean
6 g baking powder

Separate egg yolks and egg whites and whisk the egg whites to make a stiff meringue. Whisk the yolks together with sugar and vanilla so that it lightens in colour and doubles in size. Add oil and water and mix. Add flour and baking powder and mix well. Lastly fold in the meringue. Bake at 175° C, until golden brown. It is best to check to see if the sponge is done with a toothpick and if it comes out with no crumbs, remove from oven and let cool.

Dark chocolate mousse:
170 g dark chocolate
280 ml cream
pinch of salt
4 g gelatin (1 and 1/4 tsp)
20 ml water (1 and 1/4  tbsp)

Chop the chocolate into pieces and heat it together with 120 ml of cream and salt in the microwave. Heat until almost boiling, leave it for a few minutes, then stir to melt the chocolate. Leave to cool to room temperature. Soak the gelatin in water and let it bloom. Whip up the remaining 160 ml of cream. Once the chocolate has cooled, melt the gelatin in the microwave and add it to the chocolate. Mix well and add the whipped cream. Put the brownie base on a serving plate and line it with baking paper or acetate and a cake ring. Pour the mousse on the brownie and let it cool in the fridge for 20 minutes. It needs to set at least that much that we can pour the next layer on without them mixing.

Raspberry mousse
250 g raspberries
100 g sugar
6 g gelatin (2 tsp)
60 ml water (4 tbsp)
30 ml lemon juice (2 tbsp)
1 egg white 
270 g cream

Mix the egg whites with 30 g sugar, heat over steam until the mixture is warm to touch, stirring constantly. Remove from heat and whisk for 5 minutes or until the mix has cooled down to room temperature to get a firm Swiss Meringue. Blend the gelatin with 1 tbsp water and 1 tbsp lemon juice and let it bloom. Mix the raspberries with 3 tbsp of water and 1 tbsp of lemon juice and puree with a hand blender. Heat the puree just a bit, since this will make it a bit less thick and strain everything through a fine mesh strainer to remove the seeds. Add the remaining sugar and cook on medium heat for 5 minutes. The sugar will make it somewhat thicker, then add gelatin and stir until it has dissolved. Cool the puree to room temperature and in the meantime whisk the cream to just a bit more than soft peaks. Add the raspberries to the Swiss meringue and fold it in until well mixed. Add the whipped cream and again fold it in. Pour over the at least partially set dark chocolate mousse.

Mousse bele čokolade
260 g white chocolate
360 ml cream
4 tbsp honey (60 g)
1 vanilla bean
pinch of salt
6 g gelatin (2 tsp)
30 ml water (2 tbsp)

Prepare the final mousse layer by chopping up white chocolate and mixing it with 120 ml cream, honey, vanilla and salt and melting it in the microwave. Repeat the step with gelatin and the remaining 240 ml of whipped cream as before with the dark chocolate mousse. Pour on top of the raspberry mousse. Leave in the fridge overnight.


If the oven is your addiction of choice, you bake for any occasion. Any excuse is good enough. Birthday, anniversary, holiday, moving party, your kid goes to school, your kid finishes school,  it's the weekend, basically anything. You must really fight the urge to bake for any menial occasion like it it is the biggest event of the year. A while ago I changed my job and before I left, I treated my soon to be former colleagues to some homemade deliciousness. That's a good enough reason right? To lessen the blow? Suuuuure. I've baked for way less important occasions, so a life milestone must qualify!

This dessert caught my eye as soon as I saw its photo on Pinterest. And let me tell you it turns out it is not just love at first sight, but also love at first taste. Like so good that when you take it out of the fridge, you know that you will not be putting any of the leftovers back again. Or if you bring it to work and you have to disappoint your dear husband that there is no more pieces left for his taste test. Better luck next time. Because with this one, there is sure to be a next time.

For a 16 cm sized cake (double for 26 cm sized cake):

Brownie base:
50 g flour
40 g bitter cocoa
2 g salt
2 g baking powder
60 g butter
100 g brown sugar
1 egg
1 tsp of vanilla extract or 1 vanilla bean

Chocolate mousse:
130 g dark chocolate
210 ml cream
pinch of salt
3 g gelatin (1 tsp)
15 ml water (1 tbsp)

Raspberry mousse:
130 g white chocolate
180 ml cream
pinch of salt
3 g gelatin (1 tsp)
15 ml water (1 tbsp)
red food colour
100 g raspberries (fresh or frozen)

Vanilla mousse:
130 g white chocolate
180 ml cream
2 tbsp honey (30 g)
1 vanilla bean
pinch of salt
3 g gelatin (1 tsp)
15 ml water (1 tbsp)

To decorate:
60 g dark chocolate
60 ml cream
60 g fresh raspberries 

Brownie base

Mix flour, cocoa, salt and baking powder together in a bowl and set aside. 


Cut the butter into smaller pieces, melt them on low heat and add sugar. Let the sugar dissolve, but don't let it boil. The sugar might not entirely dissolve, but that is ok, as long as at least most of it dissolves. Remove from heat and wait until it cools to room temperature, then add eggs and vanilla. 


Lastly add the dry ingredients. The batter will be very thick. 


Pour it in a greased and floured cake pan and bake at 180° C for approx. 25 minut or until the toothpick comes out dry or with only a few crumbs attached. 


This sponge will be really dense, actually it is not really a sponge, but really more like a mix between fudge and brownie. If you want a softer base, you should use another recipe.

Chocolate mousse 

Chop the chocolate into pieces and heat it together with 90 ml of cream and salt in the microwave. Heat until almost boiling, leave it for a few minutes, then stir to melt the chocolate. Leave to cool to room temperature.


Soak the gelatin in water and let it bloom. Whip up the remaining 120 ml of cream.  sladke smetane. Once the chocolate has cooled, melt the gelatin in the microwave and add it to the chocolate. Mix well and add the whipped cream.


Put the brownie base on a serving plate and line it with baking paper or acetate and a cake ring.


Pour the mousse on the brownie and let it cool in the fridge for 20 minutes. It needs to set at least that much that we can pour the next layer on without them mixing. 

Raspberry mousse

For the next layer puree 40 g of raspberries and use a fine mesh sieve to strain it to remove the seeds. Add 60 ml of cream together with a pinch of salt and heat it in a microwave the same as the dark chocolate mousse.


For visual effect you can add some red food colour because truthfully this will come out way more white than pink otherwise. I recommend gel food colours, which are highly concentrated, so use them just in small amounts. Repeat the step with gelatin and whipped cream as before with the previous mousse and pour it on the set chocolate mousse. Place whole raspberries into the raspberry mixture. If you want this to be more fruity, don't skimp on the raspberries, because I was hardly able to taste them in the mousse. The white chocolate is way to strong unfortunately (scroll to the bottom of the page for the solution).


Again let it cool in the fridge for 20 minutes. 

Vanilla mousse

Prepare the final mousse layer by chopping up white chocolate and mixing it with 60 ml cream, honey, vanilla and salt and melting it in the microwave.


Repeat the step with gelatin and whipped cream as before with the previous mousses and pour it on the set chocolate mousse. Don't be alarmed by the colour of the mix, it will be kind of brown-ish and unlike the one you see in the finished photos, but once the mousse sets, it will lighten up and be more of a off white colour. Leave in the fridge overnight.


Final decorating

Chop up the dark chocolate and melt it together with the cream and let it cool a bit. Take the mousse from the fridge, remove the baking paper/acetate and the ring and pour the ganache over the top. The ganache should really cool to be a bit thicker. You can see that I was a little too impatient and my ganache was more on the runny side, hence the rim of the mousse shows through. Some fresh raspberries on top, but that is just my preference. Decorate as you wish and enjoy!


Fell like this couldn't be any better? Think again and try my improved version of this dessert.

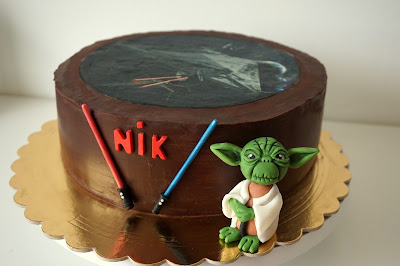
I am not a Star Wars fan. Not even in the slightest. Actually I have not seen any of the movies.  None. Zero. But at the same time I don't know anybody who would not recognise at least some of the characters of this franchise. Even me. Maybe it is because of the Darth Vader costume that my son chose for last masquerades (which is kind of like our version of the Halloween) or because of the lightsabers that we haaaaad to get (seriously it was like their lives depended on it).

So if a kid wants a Star Wars cake, I think of exactly that: lightsabers and Darth Vader. Oooh and Yoda of course. But my extensive knowledge ends there.

Although I was already provided with a rice paper transfer of some sort of space ship (I am telling you I am clueless), I couldn't resist adding a few of details, to make the cake feel more mine.

Sweet little Yoda looks complicated to make, but it really isn't, take my word for it. I sometime struggle with a character, which just would not look like I want it, but Yoda is luckily still so popular that someone tackled this task before me and was kind enough to give a step by step tutorial on how to do it. A nice Dutch girl, who uses the name the Cake Duchess, was of immense help to me and her tutorial was super helpful.


I opted to only ganache the cake without any fondant and here is the final result. In the word of Yoda: "Cute cake, this is. Yes, hmmmmmm."


Calling all chocoholics and coffee addicts!

Chocolate and coffee have always been BFFs, so it was a no brainer what to make for my husband's birthday, who cannot get up in the morning without a cup of coffee. Well he will get up, but his brain is left behind somewhere curled up in a bed upstairs.

A small sugar fix in the morning is also right up his alley, so I came up with this super easy recipe for a treat that combines both. Soooo I didn't really invent something special, since this is just dark chocolate ganache with coffee, but still ... these were actually my beginnings or better yet beginnings of a blog, which I started a little over a year ago (the original one, where I write in my language).

If you disregards the time that it takes for the ganache to thicken, it takes 10 minutes to make these small bites - 5 minutes to make the ganache and 5 minutes to form the truffles.

For approx. 20 truffles:
100 ml cream
200 g dark chocolate
3 tsp instant coffee
bitter cocoa

Chop chocolate in small chunks and put it into a bowl. Pour your cream into a small pot and heat it up to boiling point ( do not boil it), remove from stove and mix in instant coffee until it has completely dissolved. Pour the cream over the chocolate and let it sit for a few minutes.

Mix the cream and chocolate until the chocolate is melted and the mixture is completely smooth. If not, heat it in a microwave for additional 15 - 30 seconds and mix until there are no hard pieces of chocolate left.


Cover the mixture with a foil, so that the foil touches the mixture. By doing so you prevent the mixture from crusting and then you don't end up with hard chocolate pieces in your truffles. You will loose a bit of the ganache when you peel of the foil, but it is really a small amount and I wouldn't worry about it. It is much nicer to have an even smooth mixture that lets in your mouth. Leave the mixture on a counter overnight or if you are in a hurry stick it in a fridge, but it will not thicken evenly as it would on a counter. It will become harder on the edge of the bowl and stay softer in the middle, so I would mix it a couple of times during cooling; you do not need to mix it, if you leave it on the counter. Leaving it overnight also has the added benefit that the coffee flavour can develop over time. You will taste the coffee much more the next day than when you initially mix it in, so don't overdo it.

When the mixture has thickened, you can it into truffles. You will know it is thick enough, when you can spoon a bit in your hand and form it into a ball shape. It won't thicken so much that you can form a perfect ball, but you can certainly make a ball like shape, kinda more rustic looking. If it does not want to thicken enough, put it in the fridge for a bit and try again. Roll the truffles in bitter cocoa. You can also use sweet cocoa, but the bitter one goes so much better with the coffee mixture.

If there are any left that need storing (not likely ... :) ), store them in the fridge, but leave them at a room temperature before serving again.